using XAMPP:

- download the WP zip package from WordPress.org
- create a subdirectory in XAMPP/htdocs (i.e.: subdir)
- unpack the zip in that directory
- because it unpacks in a \wordpress\ subdirectory, when it finishes move the data one directory up and delete the \wordpress\ subdirectory
- run in a browser phpMyAdmin (i.e.: just type http://localhost/phpmyadmin in the browser) and
- create a new database giving it simply a name (e.g. dbname). The super user is root (doesn’t have or need a password). Note the name of the database
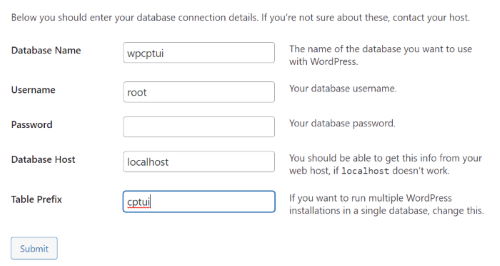
- run the wordpress installer in the browser by typing (in the browser): http://localhost/subdir. The installer has now started and asks you to select a language. Then give:
- the name of the database (dbname you just created in step 6),
- the name of the user (root),
- leave pswd empty,
- leave localhost and
- the prefix you want your tables to have (e.g. wp_ or db3 or jet or bks or cpts or anything)
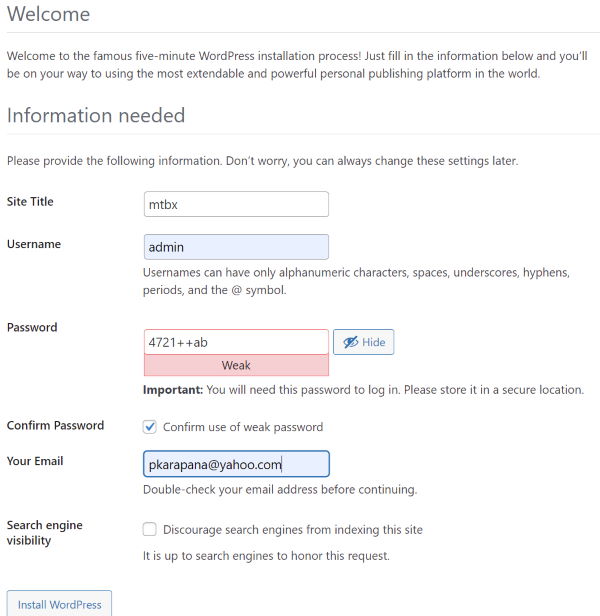
- now you will have to give the wordpress installation administrator name (anything, i.e.: you can even give admin), password (1234abcd) and an email address. Remember that this is a local installation and doesn’t require a lot of security because you are the only one in the world that can see it.

To enable multi-site:
Add the following code to your wp-config.php file just before the /* That’s all, stop editing! Happy blogging. */ line
- /* Multisite */
- define( ‘WP_ALLOW_MULTISITE‘, true );
This code simply enables the multisite feature on your WordPress site. Once enabled, you will still need to setup the multisite network:
- deactivate all plug-ins
- go to Dashboard/Tools, select Network Setup and click install
- follow the instructions about the necessary changes in wp-config.php and .htaccess
- logout and re-login
As WordPress evolves constantly always take a look in WordPress.org for that.

